BPVM Snack Pack #7 - Node Handlers: The Translation Squad
Every node in your Blueprint needs a translator. Meet the Node Handlers - the unsung heroes that turn your visual nodes into executable code.
TL;DR — Every Blueprint node type gets a dedicated Node Handler (like FKCHandler_Select) that translates it in two phases: RegisterNets reserves an FBPTerminal for each pin, then Compile emits intermediate FBlueprintCompiledStatement objects. Splitting the work into two passes guarantees every variable exists before any node references it, and the backend later converts those statements into actual bytecode.
The content in this post is based on Unreal Engine 5.6.0
BPVM Snack Pack - Quick Blueprint knowledge drops! Part of the Blueprint to Bytecode series.
The Translation Problem
You drag a “Select” node into your Blueprint. You connect some pins. You hit compile.
But wait - how does that visual node become actual executable code?
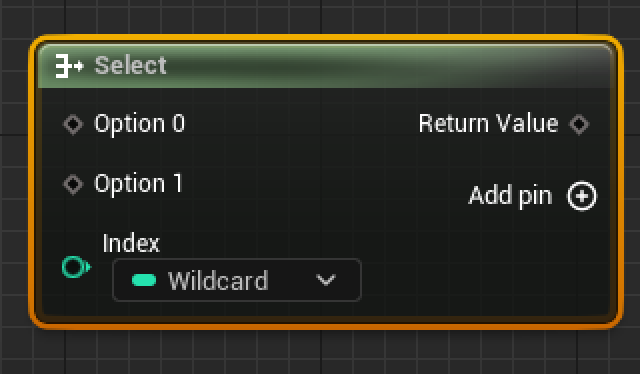
Enter the Node Handlers
Every node type has a dedicated translator called a Node Handler:
1
2
3
4
5
// For every UK2Node type...
UK2Node_Select  →  FKCHandler_Select
UK2Node_CallFunction  →  FKCHandler_CallFunction
UK2Node_VariableGet  →  FKCHandler_VariableGet
// ... hundreds more!
Think of them as specialized translators at the UN:
- Each handler speaks one “node language”
- They all translate to the same “bytecode language”
- Without them, your nodes are just pretty pictures!
The Handler Pattern
Every handler follows the same pattern:
1
2
3
4
5
6
7
8
9
class FKCHandler_Select : public FNodeHandlingFunctor
{
public:
    // Step 1: "What data do I need?"
    virtual void RegisterNets(FKismetFunctionContext& Context, UEdGraphNode* Node);

    // Step 2: "How do I translate this?"
    virtual void Compile(FKismetFunctionContext& Context, UEdGraphNode* Node);
};
Two jobs, crystal clear separation of concerns!
RegisterNets: The Setup Phase
Before compiling, handlers need to register their data needs:
1
2
3
4
5
6
7
8
9
10
11
12
13
14
15
16
17
18
void FKCHandler_Select::RegisterNets(Context, Node)
{
    // "I need storage for these pins!"

    // Register the index pin
    FBPTerminal* IndexTerm = Context.CreateLocalTerminal();
    Context.NetMap.Add(IndexPin, IndexTerm);

    // Register each option pin
    for (UEdGraphPin* Pin : OptionPins) {
        FBPTerminal* Term = Context.CreateLocalTerminal();
        Context.NetMap.Add(Pin, Term);
    }

    // Register output
    FBPTerminal* OutputTerm = Context.CreateLocalTerminal();
    Context.NetMap.Add(OutputPin, OutputTerm);
}
It’s like declaring variables before using them - reserve the memory first!
Compile: The Translation Phase
Now the actual translation happens:
1
2
3
4
5
6
7
8
9
10
11
12
13
14
15
16
17
18
19
void FKCHandler_Select::Compile(Context, Node)
{
    // Create the bytecode statement
    FBlueprintCompiledStatement* Statement = new FBlueprintCompiledStatement();
    Statement->Type = KCST_SwitchValue;  // "This is a switch operation"

    // Get our registered terminals
    FBPTerminal* IndexTerm = Context.NetMap.FindRef(IndexPin);
    FBPTerminal* OutputTerm = Context.NetMap.FindRef(OutputPin);

    // Build the switch logic
    Statement->LHS = OutputTerm;  // Where to store result
    Statement->RHS.Add(IndexTerm);  // What to switch on

    // Add each case
    for (int32 i = 0; i < Options.Num(); i++) {
        Statement->RHS.Add(OptionTerms[i]);
    }
}
Real Example: The Select Node
Let’s see how a Select node gets translated:
What You See:
1
2
3
4
5
Index: 2
Option 0: "Hello"
Option 1: "World"
Option 2: "!"      <-- Selected!
Output: "!"
What RegisterNets Does:
1
2
3
4
5
6
// Reserve memory slots
Terminal_0 = Index (integer)
Terminal_1 = Option0 (string)
Terminal_2 = Option1 (string)
Terminal_3 = Option2 (string)
Terminal_4 = Output (string)
What Compile Creates:
1
2
3
4
5
6
7
8
Statement: KCST_SwitchValue
LHS: Terminal_4 (output)
RHS: [
    Terminal_0,  // Index
    Terminal_1,  // Case 0
    Terminal_2,  // Case 1
    Terminal_3   // Case 2
]
The Handler Registry
The compiler maintains a giant map of handlers:
1
2
3
4
5
// During compiler initialization
NodeHandlers.Add(UK2Node_Select::StaticClass(), new FKCHandler_Select());
NodeHandlers.Add(UK2Node_CallFunction::StaticClass(), new FKCHandler_CallFunction());
NodeHandlers.Add(UK2Node_VariableGet::StaticClass(), new FKCHandler_VariableGet());
// ... hundreds more
When compiling your graph:
1
2
3
4
5
6
7
8
9
for (UEdGraphNode* Node : Graph->Nodes) {
    // Find the right translator
    FNodeHandlingFunctor* Handler = NodeHandlers.FindRef(Node->GetClass());

    if (Handler) {
        Handler->RegisterNets(Context, Node);  // Setup
        Handler->Compile(Context, Node);        // Translate
    }
}
Why Two Phases?
Why not just compile directly?
The compiler needs to know about ALL variables before generating code:
1
2
3
4
5
6
7
8
9
// Bad: Compile as we go
CompileNode(A);  // Creates var X
CompileNode(B);  // Needs var X... does it exist?

// Good: Two phases
RegisterNets(A);  // Declare var X
RegisterNets(B);  // Declare var Y
Compile(A);       // Use var X (guaranteed to exist)
Compile(B);       // Use var X and Y (both exist!)
Special Handler Powers
Some handlers have special abilities:
1
2
3
4
5
6
7
8
9
10
11
12
class FKCHandler_CallFunction : public FNodeHandlingFunctor
{
    // Special power: Can optimize certain calls!
    virtual void Transform(FKismetFunctionContext& Context, UEdGraphNode* Node) {
        // Convert Print(String) to fastpath if possible
    }

    // Special power: Runs early for signatures!
    virtual bool RequiresRegisterNetsBeforeScheduling() {
        return true;  // Function entry/exit nodes need this
    }
};
The Statement Output
Handlers produce intermediate statements (not bytecode yet!):
1
2
3
4
5
6
7
8
9
10
11
12
// Handler produces this:
Statement {
    Type: KCST_CallFunction
    Function: "PrintString"
    Parameters: ["Hello World"]
}

// Backend converts to bytecode later:
0x44 (EX_CallFunc)
0x08 (Function ID)
"Hello World"
0x53 (EX_Return)
It’s a two-stage rocket - handlers get you to orbit, backend gets you to the moon!
Quick Takeaway
- Every node type has a Node Handler (its personal translator)
- RegisterNets: “I need these variables” (setup phase)
- Compile: “Here’s how to execute me” (translation phase)
- Handlers produce statements, not bytecode (that comes later)
- Two phases ensure all variables exist before use
- It’s the Strategy Pattern in action - one handler per node type!
Your Nodes Come Alive
Next time you drag a node into your Blueprint, remember:
- That node has a dedicated handler waiting to translate it
- RegisterNets runs first to set up the workspace
- Compile runs second to generate the logic
- Without handlers, your nodes would just be pretty pictures!
Want More Details?
For the complete handler deep-dive:
Next snack: The magic of Clean and Sanitize!
🍿 BPVM Snack Pack Series
- ← #6: The CDO Mystery
- #7: Node Handlers Explained ← You are here
- #8: Clean and Sanitize Magic →
Cite this post
Jayden Zhang. “BPVM Snack Pack #7 - Node Handlers: The Translation Squad.” Jayden Zhang’s Blog, October 28, 2025. https://www.jaydengames.com/posts/bpvm-snack-07-node-handlers/
BibTeX
@misc{bpvm-snack-07-node-handlers2025,
  author = {Jayden Zhang},
  title  = {BPVM Snack Pack #7 - Node Handlers: The Translation Squad},
  year   = {2025},
  url    = {https://www.jaydengames.com/posts/bpvm-snack-07-node-handlers/},
  note   = {Jayden Zhang’s Blog}
}