BPVM Snack Pack #3 - Compilation Kick-Off
You hit 'Compile'. Behind that button is a 16-stage pipeline that handles dependencies, generates code, and updates live instances. Here's how it works.
The content in this post is based on Unreal Engine 5.4.0
BPVM Snack Pack is a companion series to the deep-dive Blueprint to Bytecode series. Each snack is 3-5 minutes of pure knowledge!
The Compile Button

You click it. It turns green. Ship it!
But between that click and the green checkmark, there’s a 16-stage compilation pipeline executing in precise order. Think of it like a game’s rendering pipeline, but for code generation.
Stage 0: The Button Click
When you click “Compile”, you trigger a command from this function:
1
2
3
4
5
6
7
8
9
10
FBlueprintEditorToolbar::AddCompileToolbar()
{
    // Creates the compile button
    FToolMenuEntry& CompileButton = InSection.AddEntry(
        FToolMenuEntry::InitToolBarButton(
            Commands.Compile,  // ← This is the command
            ...
        )
    );
}
This kicks off FBlueprintEditor::Compile(), which adds your Blueprint to a compilation queue.
The Queue System
Unreal doesn’t compile Blueprints one at a time - it uses FBlueprintCompilationManager to batch them:
1
2
3
QueueForCompilation(YourBlueprint);
// ... queue up dependencies too ...
FlushCompilationQueueImpl();  // ← The real work starts here
Why batch? Same reason games batch draw calls: if Blueprint A depends on Blueprint B, and B depends on C, you need to resolve the dependency graph and process them in topological order.
The 16 Stages (High-Level)
Here’s what FlushCompilationQueueImpl() does:
Preparation (Stages I-VII):
- GATHER - Find all dependent Blueprints
- FILTER - Remove duplicates and invalid ones
- SORT - Order by dependency (C → B → A)
- SET FLAGS - Mark as “currently compiling”
- VALIDATE - Check for errors
- PURGE - Clean up old data (load-time only)
- DISCARD SKELETON CDO - Prepare for regeneration
Compilation (Stages VIII-XIII):
- RECOMPILE SKELETON - Create class headers
- RECONSTRUCT NODES - Update deprecated nodes
- CREATE REINSTANCER - Prepare to update instances
- CREATE CLASS HIERARCHY - Link parent/child classes
- COMPILE CLASS LAYOUT - Generate properties and functions ⚡
- COMPILE CLASS FUNCTIONS - Generate bytecode ⚡⚡
Finalization (Stages XIV-XVI):
- REINSTANCE - Update all existing instances
- POST CDO COMPILED - Finalize Class Default Object
- CLEAR FLAGS - Mark as “done”
The Two Critical Stages
Stages 12 and 13 are where code generation happens:
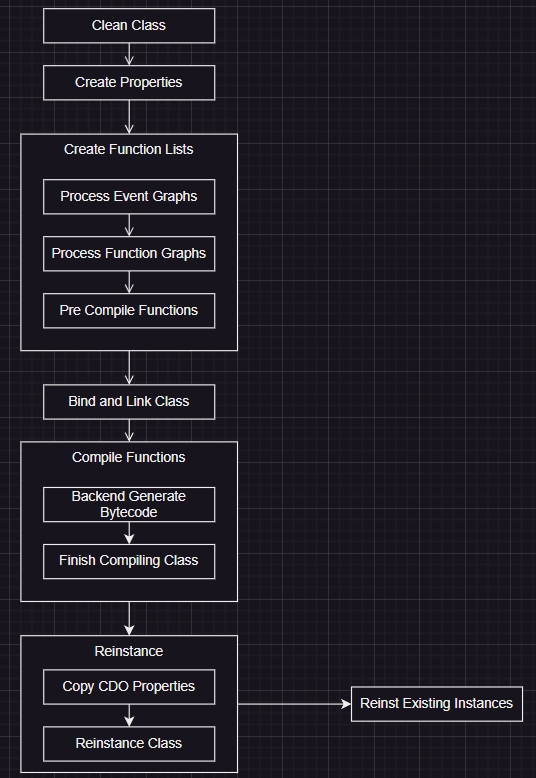
Stage XII - COMPILE CLASS LAYOUT:
- Creates
UPropertiesfor your variables - Creates
UFunctionsfor your functions - Sets up the class structure (like generating a C++ header)
Stage XIII - COMPILE CLASS FUNCTIONS:
- Converts your nodes into intermediate statements
- Generates bytecode from those statements
- Links bytecode into the class (like compiling a .cpp file)
Why So Many Stages?
Each stage handles a specific problem:
Circular Dependencies?
- Stage I-III (Gather/Sort) handles this
Blueprint A references Blueprint B that’s not compiled yet?
- Stage VIII (Skeleton) creates a “header” first so B can reference A
Existing instances in the level?
- Stage XIV (Reinstance) updates them all
Old data from previous compile?
- Stage VII (Purge) cleans it up
Quick Takeaway
When you hit “Compile”:
- Your Blueprint joins a compilation queue
- The queue sorts by dependencies
- 16 stages execute in order
- Stages 12-13 do the actual compilation
- Result: Fresh bytecode ready to run!
The Journey Ahead
In the next snacks, we’ll zoom into:
- Stage XII - How variables and functions are created
- Stage XIII - How nodes become bytecode
- Reinstancing - How existing instances get updated
Want More Details?
For the complete 16-stage breakdown with code:
Next snack: The mysterious “Skeleton Class”!
🍿 BPVM Snack Pack Series
- ← #2: The Graph System Decoded
- #3: Compilation Kick-Off ← You are here
- #4: Skeleton Classes Explained →